Pete Taran
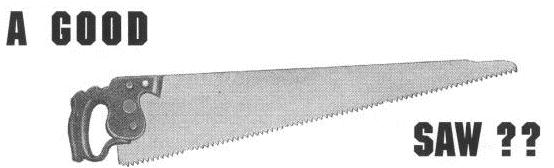
Having collected and used vintage handsaws for many years, people often ask me, "What is a good saw to look for in antique stores and auctions, and how can I tell if it will cut OK?" There are many facets to this question. In this article I hope to answer this question, and give some pointers about how to recondition vintage saws and get them sharp again.
I really enjoy using hand saws, especially old ones. Back in the mid to late 18th Century when saws started to be mass produced, they were the most costly and technologically difficult woodworking tool to make. Consider that in a chisel of that vintage, only a small part of the tool is actually cast steel, the part of the blade that actually holds an edge and does the cutting. In a saw, the entire blade is cast steel. To make it even more interesting, the blade had to be rolled to a uniform thickness, hardened and tempered, and finally "glazed" or taper ground to a high sheen. This was not an easy job to be sure. Also consider that files were hand cut, one by one, and were used to form and file the teeth on the saw. The job was finished by hand setting the teeth with a wrest and fitting the blade to a handle. It is no small wonder that very few examples of 18th century saws exist. They were simply too valuable a commodity, being used until there was virtually no blade left.
 Saws that are likely to be found
in antique stores and at auctions were probably made by one of
three companies: Disston, Simonds and Atkins. All three of these
companies made high quality hand saws and are worth looking for.
In addition to these three companies, there were many other smaller
firms. Some of these companies made an excellent product, some
not. For the beginner it would be best to stick with one of these
larger firms until experience and confidence in picking out a
good saw on the second hand market is gained. Each company had
a premium line of saw. They are too numerous to mention them all
here, but I'll attempt to point out some of the better ones to
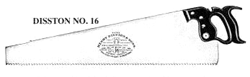
look for. For Disston, the #12 and #16 were certainly at the top
of the pack. The D8 is also a fine saw which is very common on
the old tools market. Simond's top quality saw was the #4. Also
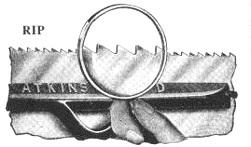
very good were the #4 1/2 and #5. Atkins' premium handsaw was
the #400, although the #68 was also very good.
Saws that are likely to be found
in antique stores and at auctions were probably made by one of
three companies: Disston, Simonds and Atkins. All three of these
companies made high quality hand saws and are worth looking for.
In addition to these three companies, there were many other smaller
firms. Some of these companies made an excellent product, some
not. For the beginner it would be best to stick with one of these
larger firms until experience and confidence in picking out a
good saw on the second hand market is gained. Each company had
a premium line of saw. They are too numerous to mention them all
here, but I'll attempt to point out some of the better ones to
look for. For Disston, the #12 and #16 were certainly at the top
of the pack. The D8 is also a fine saw which is very common on
the old tools market. Simond's top quality saw was the #4. Also
very good were the #4 1/2 and #5. Atkins' premium handsaw was
the #400, although the #68 was also very good.
 Premium handsaws all have several
things in common. First and foremost is the blade. Good saws have
blades made of the finest spring steel, properly tempered to provide
the hardest and toughest blade possible. This point is critical.
A steel too hard could not be easily filed and would be impossible
to set because the teeth would snap off when the set was applied.
If the steel was too soft, the saw would spend the bulk of its
time at the filers bench from dulling too fast. In addition to
the temper, a taper ground blade was very desirable.
Premium handsaws all have several
things in common. First and foremost is the blade. Good saws have
blades made of the finest spring steel, properly tempered to provide
the hardest and toughest blade possible. This point is critical.
A steel too hard could not be easily filed and would be impossible
to set because the teeth would snap off when the set was applied.
If the steel was too soft, the saw would spend the bulk of its
time at the filers bench from dulling too fast. In addition to
the temper, a taper ground blade was very desirable.
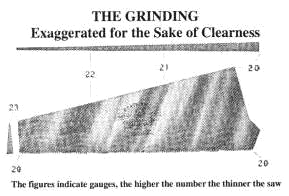 Taper ground refers to how the
blade is ground to provide clearance in the cut. If you just took
a flat piece of spring steel of uniform thickness, it would require
much more set than a blade that tapered in thickness from the
cutting edge to the back of the saw. The blade also tapered in
thickness from the heel to the toe. A blade tapered in this manner
reduces the amount of set required since the edge is the thickest
part of the blade. In fact, on a good saw, the thickest part of
the blade should be right below the handle, and the thinnest at
the other end near the rounded point of the toe. A good saw should
not have a thicker blade than necessary to accomplish the cut.
Thicker blades cut wider kerfs which require more effort. A properly
set taper ground blade glides through the work with almost no
effort. Virtually all saws found on the old tools market have
poorly filed and set teeth. It is a rare day indeed when one can
pick a saw up and use it right away without any work. When looking
at a saw, carefully inspect the blade. By far the best situation
is to find a saw with the blade bright with no rust. While this
is not out of the question, far more saws are encountered which
have some degree of rust on them. The presence of rust does not
ruin a saw. Is the rust very thick and flaking? If so, this saw
is not worth bothering with. If it is just light surface rust,
it can be removed and the saw sharpened and set. Look for pits
in the steel. A few won't cause any harm, but a large concentration
along the cutting edge will never permit the saw to be as sharp
as it could be without the pits. Sight along the blade and look
for kinks. Gradual curves can be removed with a little effort.
Sharp kinks that crease the metal make a saw impossible to straighten.
When inspecting a blade, also look at how much of it is left.
Avoid saws that have been sharpened so much that they come to
a point at the end of the blade. They don't have enough steel
left to cut without kinking the blade.
Taper ground refers to how the
blade is ground to provide clearance in the cut. If you just took
a flat piece of spring steel of uniform thickness, it would require
much more set than a blade that tapered in thickness from the
cutting edge to the back of the saw. The blade also tapered in
thickness from the heel to the toe. A blade tapered in this manner
reduces the amount of set required since the edge is the thickest
part of the blade. In fact, on a good saw, the thickest part of
the blade should be right below the handle, and the thinnest at
the other end near the rounded point of the toe. A good saw should
not have a thicker blade than necessary to accomplish the cut.
Thicker blades cut wider kerfs which require more effort. A properly
set taper ground blade glides through the work with almost no
effort. Virtually all saws found on the old tools market have
poorly filed and set teeth. It is a rare day indeed when one can
pick a saw up and use it right away without any work. When looking
at a saw, carefully inspect the blade. By far the best situation
is to find a saw with the blade bright with no rust. While this
is not out of the question, far more saws are encountered which
have some degree of rust on them. The presence of rust does not
ruin a saw. Is the rust very thick and flaking? If so, this saw
is not worth bothering with. If it is just light surface rust,
it can be removed and the saw sharpened and set. Look for pits
in the steel. A few won't cause any harm, but a large concentration
along the cutting edge will never permit the saw to be as sharp
as it could be without the pits. Sight along the blade and look
for kinks. Gradual curves can be removed with a little effort.
Sharp kinks that crease the metal make a saw impossible to straighten.
When inspecting a blade, also look at how much of it is left.
Avoid saws that have been sharpened so much that they come to
a point at the end of the blade. They don't have enough steel
left to cut without kinking the blade.
 Handle condition is also very important.
Most saw handles are made of beech or apple. Apple was typically
used on the highest quality saws with beech reserved for the more
common grades. The handle should have all its screws and be in
good shape. While a saw with chip off the upper and lower horns
of the handle won't affect how well it cuts, it should not be
so damaged that it is uncomfortable to hold. Avoid saws that have
cracked or severely damaged handles unless you're prepared to
make a replacement. Most blades are secured to the handle with
one of two types of screw. Very early saws, prior to 1875 or so,
have split nut screws. A special screwdriver is required to tighten
these screws. While these screwdrivers aren't common, they aren't
difficult to make. Unless a handle with split nuts is loose, don't
try to tighten or remove them. They were draw filed to be flush
with the wood and attempting to tighten them will mar the finish
and make the end of the screw stick out past the surface of the
handle. In addition, this type of screw generally has a thinner
shank making them very easily sheared off due to over tightening.
Many saws on the old tools market with split nut screws are found
with one or more screw missing or damaged. Avoid a saw that has
more than one damaged split nut screw as they are hard to match
from one saw to the next. Most saws that are encountered have
the more conventional saw nut that requires an ordinary slotted
screwdriver to remove them. It is perfectly acceptable to tighten
or remove these if required. Be sure to align the square shank
of the nut with the square hole in the handle when replacing screws
in the handle. Failure to do so will make it impossible to draw
the screw tight against the handle and may cause the screw to
strip from the excessive force required to seat it. Virtually
all screws of this type will work interchangeably if the head
sizes are matched. This is a convenient feature. There are no
shortage of trashed saws with perfectly good screws. I pick these
up when I see them and harvest the screws for use on saws that
need them.
Handle condition is also very important.
Most saw handles are made of beech or apple. Apple was typically
used on the highest quality saws with beech reserved for the more
common grades. The handle should have all its screws and be in
good shape. While a saw with chip off the upper and lower horns
of the handle won't affect how well it cuts, it should not be
so damaged that it is uncomfortable to hold. Avoid saws that have
cracked or severely damaged handles unless you're prepared to
make a replacement. Most blades are secured to the handle with
one of two types of screw. Very early saws, prior to 1875 or so,
have split nut screws. A special screwdriver is required to tighten
these screws. While these screwdrivers aren't common, they aren't
difficult to make. Unless a handle with split nuts is loose, don't
try to tighten or remove them. They were draw filed to be flush
with the wood and attempting to tighten them will mar the finish
and make the end of the screw stick out past the surface of the
handle. In addition, this type of screw generally has a thinner
shank making them very easily sheared off due to over tightening.
Many saws on the old tools market with split nut screws are found
with one or more screw missing or damaged. Avoid a saw that has
more than one damaged split nut screw as they are hard to match
from one saw to the next. Most saws that are encountered have
the more conventional saw nut that requires an ordinary slotted
screwdriver to remove them. It is perfectly acceptable to tighten
or remove these if required. Be sure to align the square shank
of the nut with the square hole in the handle when replacing screws
in the handle. Failure to do so will make it impossible to draw
the screw tight against the handle and may cause the screw to
strip from the excessive force required to seat it. Virtually
all screws of this type will work interchangeably if the head
sizes are matched. This is a convenient feature. There are no
shortage of trashed saws with perfectly good screws. I pick these
up when I see them and harvest the screws for use on saws that
need them.
 The first thing is to remove any
rust that might be on the blade. How much rust is present determines
how rigorous a technique is required. If the saw has ordinary
saw screws, remove the handle first. If the saw has light surface
rust, some 00 steel wool and mineral spirits will do the trick.
Don't try to get the saw bright again, just remove the rust. If
the rust is deeper, take a razor blade scraper and scrape at an
angle like you are trying to peel something off your car windshield.
This will remove a lot of rust fast. Make sure you don't dig the
corners of the scraper in, it will scratch the saw blade. This
is especially useful around the handle area which tends to collect
rust and crud. If the blade was rusted deep enough to have to
scrape off the rust, it will more than likely need to be followed
up with some 220 grit silicon carbide sandpaper to remove all
the rust that the razor missed. Rub firmly in long strokes the
length of the blade. Lubricate the sandpaper with mineral spirits.
Again, don't try to make the saw bright, just get off the loose
rust. You can check your progress by wiping off the red rust slurry
with a towel. If the blade looks a steely gray, you've sanded
it enough. Over use of sandpaper will remove any patina that remains
and make the saw look garish. It will also remove any etch that
might be hidden under the rust. Once the saw has been rubbed free
of rust, wipe it down with some mineral spirits and follow with
some paste wax.
The first thing is to remove any
rust that might be on the blade. How much rust is present determines
how rigorous a technique is required. If the saw has ordinary
saw screws, remove the handle first. If the saw has light surface
rust, some 00 steel wool and mineral spirits will do the trick.
Don't try to get the saw bright again, just remove the rust. If
the rust is deeper, take a razor blade scraper and scrape at an
angle like you are trying to peel something off your car windshield.
This will remove a lot of rust fast. Make sure you don't dig the
corners of the scraper in, it will scratch the saw blade. This
is especially useful around the handle area which tends to collect
rust and crud. If the blade was rusted deep enough to have to
scrape off the rust, it will more than likely need to be followed
up with some 220 grit silicon carbide sandpaper to remove all
the rust that the razor missed. Rub firmly in long strokes the
length of the blade. Lubricate the sandpaper with mineral spirits.
Again, don't try to make the saw bright, just get off the loose
rust. You can check your progress by wiping off the red rust slurry
with a towel. If the blade looks a steely gray, you've sanded
it enough. Over use of sandpaper will remove any patina that remains
and make the saw look garish. It will also remove any etch that
might be hidden under the rust. Once the saw has been rubbed free
of rust, wipe it down with some mineral spirits and follow with
some paste wax.
 While the handle is off, check
it out. Is it excessively dry or worn? I don't advocate stripping
saw handles. The only time I'd do it is if the handle was painted
some intolerable color. However, a handle can often benefit from
a good coat of boiled linseed oil. This won't harm the patina
that has accumulated on a handle, but will make scratches disappear
and provide some protection where the finish has rubbed off. As
always, properly dispose of rags that have been soaked in boiled
linseed oil--they can spontaneously combust. Place the handle
in a warm place for 24 hours after applying the oil and follow
up with some paste wax. If you plan to sharpen and set your reconditioned
saw, do it now before you reattach the handle. If you are going
to send it out, put the handle back on and find a reputable saw
sharpener. Sharpening hand saws is becoming a lost art. Check
your yellow pages to find someone in your area. They are often
listed under "Sharpening Service". When evaluating a
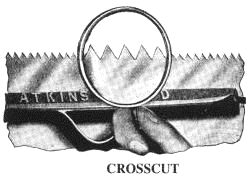
sharpening service for the first time, send them a cross cut that
is not valuable or collectible. If the teeth are broken or otherwise
damaged, make sure you find a place that can both recut and resharpen
saw teeth. Expect to pay up to $20 to have a saw completely recut
and refiled. When you get your saw back, inspect the teeth. Are
they even and the same height? Do they come to sharp points? Are
they of the correct profile? If the answer to any of these questions
is no, find another sharpening service.
While the handle is off, check
it out. Is it excessively dry or worn? I don't advocate stripping
saw handles. The only time I'd do it is if the handle was painted
some intolerable color. However, a handle can often benefit from
a good coat of boiled linseed oil. This won't harm the patina
that has accumulated on a handle, but will make scratches disappear
and provide some protection where the finish has rubbed off. As
always, properly dispose of rags that have been soaked in boiled
linseed oil--they can spontaneously combust. Place the handle
in a warm place for 24 hours after applying the oil and follow
up with some paste wax. If you plan to sharpen and set your reconditioned
saw, do it now before you reattach the handle. If you are going
to send it out, put the handle back on and find a reputable saw
sharpener. Sharpening hand saws is becoming a lost art. Check
your yellow pages to find someone in your area. They are often
listed under "Sharpening Service". When evaluating a
sharpening service for the first time, send them a cross cut that
is not valuable or collectible. If the teeth are broken or otherwise
damaged, make sure you find a place that can both recut and resharpen
saw teeth. Expect to pay up to $20 to have a saw completely recut
and refiled. When you get your saw back, inspect the teeth. Are
they even and the same height? Do they come to sharp points? Are
they of the correct profile? If the answer to any of these questions
is no, find another sharpening service.
 Since sharpening services almost
universally give saws too much set, tell them just to sharpen
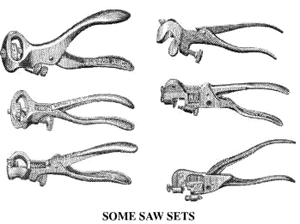
it and set it yourself. Saw sets are cheap and it is not difficult
at all to learn to do it yourself. Give the saw just enough set
to cut without binding. Pay no attention to the numbers on your
set. I've yet to find one that is calibrated anywhere close. Instead,
start with the highest number (which will give the least set)
and try your saw out. Reset as required until your saw cuts smoothly
without binding. You will find that saws used for softwood need
more set than those used on seasoned hardwood. Some would take
exception to setting a saw after it's been sharpened. I find that
it is the only way to put just the right amount of set in the
teeth. When you sharpen a saw, you remove some of the set. It
is very difficult to gauge how much you'll remove before you file
it since it is dependent on many factors such as how new the file
is, the number and force of the file strokes, etc. I use contact
cement to glue some very thin veneer on the area of the saw set
that contacts the teeth. This prevents them from dulling and provides
good, uniform results.
Since sharpening services almost
universally give saws too much set, tell them just to sharpen
it and set it yourself. Saw sets are cheap and it is not difficult
at all to learn to do it yourself. Give the saw just enough set
to cut without binding. Pay no attention to the numbers on your
set. I've yet to find one that is calibrated anywhere close. Instead,
start with the highest number (which will give the least set)
and try your saw out. Reset as required until your saw cuts smoothly
without binding. You will find that saws used for softwood need
more set than those used on seasoned hardwood. Some would take
exception to setting a saw after it's been sharpened. I find that
it is the only way to put just the right amount of set in the
teeth. When you sharpen a saw, you remove some of the set. It
is very difficult to gauge how much you'll remove before you file
it since it is dependent on many factors such as how new the file
is, the number and force of the file strokes, etc. I use contact
cement to glue some very thin veneer on the area of the saw set
that contacts the teeth. This prevents them from dulling and provides
good, uniform results.
Saws that are sharp and properly tuned are a joy to use. With a little time and patience, virtually any saw can be made to cut like a champion, tracking straight and true. Hopefully after reading this article, you'll have a better understanding about the characteristics of a good saw and how to get it cutting right.
Illustrations from the following original catalogs: Disston 1918, Disston Saw, Tool and File Manual 1942, Atkins Catalog No. 10, Atkins Saw Sense, Aktins 1919